2012年10月31日星期三

Photography Preparation for Underwater Macro Photography


After enjoying the photography of land animals, you might want to take a peek at the life underwater. Now, diving is become an easy entertainment for us. Once going deep in the sea, don' t forget to take a shot of those lovely creatures. Now, let's learn from Scott Gietler for taking a perfect underwater macro photography.
Subject - choosing a macro subject
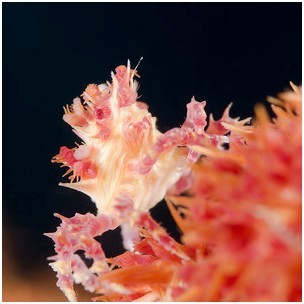
Taking great macro underwater photos starts with research. If possible, use a guide who specialized in macro subjects. Next, look at photos that have been taken at these locations. What subjects are producing the best photographs, which backgrounds and compositions look the best, what can you improve on. Based on your research, and imagined shots, decide on which lens or lenses to take on your dives.
Moment - when to take the photo
To get good at underwater macro photography, it's time to think about moment and presentation. Sometimes the subject will be a beautiful slow-moving nudibranch all by itself. You may think there is no good or bad moment for this subject. But even for a nudibranch, there is often a best moment, when its gills are fully out, if it has gills.
Presentation in underwater macro photography
Composition - Get low and evaluate different compositions, such as head on, fill the frame, diagonal, shoot from underneath. Try a few different compositions.        
Strobe position - Based on the texture of the subject, and the water visibility, giving the light a softer look may look better in macro photography.
Background - Do not risk injuring a subject or causing it to flee its habitat just to get the shot you want. 
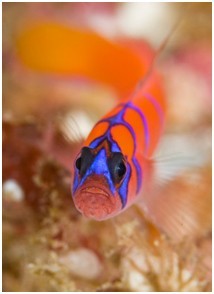
Focus - Lock focus on their eyes and recompose. If your camera has a movable focus point, use your arrow keys to move your focus point to where you want. You may need to do this often if the composition changes or your subject moves. this will help avoid a bull’s-eye composition also.
Exposure - you need to check your display to ensure a proper exposure. If you are shooting manually, you'll adjust your strobe power up or down. A TTL converter is a big help in shooting macro.
Depth of field - Remember - there is no best F-stop for macro photography. A large aperture (small f-stop) will blur the background, and a small aperture will bring more of the background into focus.
Take your time, think carefully about these items, and don’t forget to check your LCD. The better you become as a photographer, in general you will spend more time with subjects you feel are special, waiting for the right moment, and experimenting with your presentation.

2012年10月30日星期二

Photography Tips to Keep in Mind for Halloween

The keys to capturing them are not that different from the normal keys to good composition in photography. As you photograph Halloween this year keep in mind some of the basics of good digital photography from digital camera school.

Find Points of Interest
Photo by Maharepa
Before hitting the shutter ask yourself ‘what is the focal point in this image?’ All good images have something that holds the attention of those who view them.

Rule of Thirds
One way of enhancing the composition of your shots is to place your points of interest in smart positions. While the rule of thirds can be broken with great effect it’s a useful principle to keep in mind.

Fill Your Frame
Halloween is a time of drama and you can add to this in your images by getting in nice and close and filling the frame with your subjects. Whether it’s people or objects – getting in nice and tight will usually add punch to your shots.

Give Subjects Space to Look into
When photographing people one of the most effective compositional techniques is to use the space around their faces effectively by giving more room on the side of their face that they’re looking into.

Find Fresh Angles
Photo jen clix
Make your images stand out by finding fresh perspectives to shoot from rather than pumpkins.

Photograph the Details
When you step back, take a look around and notice the smaller details, you will find the ‘money shots’. Times like Halloween are filled with all kinds of smaller details including decorations, carved pumpkin, people dressed in costumes, bags full of treats, etc.

Shooting in Low Light
To really capture the mood of these situations you’ll want to avoid the stark and bright light of flash photography and so you’ll need to switch off your flash and do one (or all) of three things to some extent:

Increase your ISO – the larger your number the more sensitive your image sensor is to light and the darker conditions you can shoot in without having to slow down shutter speed. On the downside you’ll get more grainy/noisy shots.

Slow down shutter speed – choosing a longer shutter speed lets more light into your camera. On the downside you’ll see any movement in your shots blur. Consider using a tripod if you lengthen your shutter speed.

Use a larger Aperture – this widens the hole in your lens and lets more available light in. It will also lessen the depth of field in your shots. If you have a DSLR with a few different lenses is to use the ‘fastest’ lens you own as it will let you choose larger apertures. 

Picture Perfect Halloween Photo Contest


Halloween is coming! Are you ready to put on your most horrible costume and play trick or treat? With no doubt, you must have picked up camera to make a record of everything interesting. But, have you ever thought that your funny, cute or scary Halloween photos could win you a trip to Hersheypark in the Dark, a FujiFilm FinePix HS25EXR camera, a Rite-Aid photo book and more?

It’s not a dream. FujiFilm has launched a Picture Perfect Halloween Photo Contest lasting until November 7, 2012. The entry is spectacularly easy. Everyone can participate in this contest without charge. Just register and submit as many as 70 pictures per household.

The winning photographer will win a spooktacular trip for 4 to Hershey, PA to experience all of the frightfully fun rides and attractions at Hersheypark in the Dark and more. For 1st prize, short course on the Fundamentals of Digital Photography, a FUJIFILM digital camera, a $250 Rite Aid gift card and more. For 2nd prize, FUJIFILM Finepix XP170 digital camera – orange, $150 Rite Aid gift card, 16”x20” wall canvas from the Rite Aid picture center and a Hershey chocolate gift basket. If you’re interesting in this contest, submit your photos at: http://halloweenphotocontest.com/index.php

2012年10月28日星期日

Get an Extra 3 Months Membership for Free in The Guild ofPhotographers


Learning from the website is of great convenience while there is a great deal of information on the websites which may be easy to get confused and tired. If you want to become a professional photographer, a specific training from the professionals should never be missed.

After taking lessons, it is a good choice to practice. As an old saying goes, practice makes perfect. For both amateur and professional photographers, image-processing software is effective to strive for further improvement. Therefore, ArcSoft, who always determines to bring more effective solutions to professional photographers and amateurs worldwide, now has partnered with The Guild of Photographers, to bring more excellent services to you.
 
The Guild of Photographers: an association for all individuals committed to photography
Established in 1988, The Guild ofPhotographers has grown much wider to become an association for all individuals committed to the art of photography. To help everyone get the most from his camera, The Guild of Photographers offers superb training and mentoring from some of the most established names in the world of photography, as well as a highly regarded qualification program. Some unique discounts will also be provided. 
 
For more information, please visit: http://www.photoguild.co.uk

Special Offer: Whoever joins the Guild for 12 months on their website and quotes 'ArcSoft' will get an extra 3 months membership for free.


2012年10月25日星期四

How to Take Care of Your Digital Camera


The camera body, especially the lens, can be easily damaged through rough handling and scratches. Here are some tips for taking care of your precious camera, ranging from lens care, temperature and storage conditions. Be sure to follow these tips so that your camera will be well protected over its lifetime.

Lens Care
The lens of your digital camera is its eye to the outside world. It is the most important component for any camera. Make sure that you never, ever touch directly with your fingers and ensure that you put on the lens cap when not shooting pictures.
Use good lens cleaning equipment. Always use a good lens brush, lens blower and lens cloth to do the job.

Temperature
The other thing to look out for is the temperature under which the camera is stored. You should always keep the camera out of sun. One mistake that newbies always make is to store the digital camera in the extremely hot places like the car boot. Don’t do that ever. And never store it in cold environment either.

Storage
When storing your digital camera, you need to keep it away from magnets, which will affect the circuitry of your digital camera. Besides, many electronic products come with silica gel capsules. Keep these and put them in your digital camera storage box. It will prevent condensation. The batteries of the camera should also be removed if you intend to store the camera away for a long time for they can have corrosive leaks over time.

Protect Delicate Components
Protect delicate components and watch out for the memory card. More care is needed to spend on this small thing. Camera panels are also of great importance. Every time, you need to open it carefully. 

2012年10月24日星期三

Hooray, Are You Ready to Make a Jump to Windows 8?

Windows 8 is around the corner. It will be launched on 26th October and may become the most popular system in every newly-purchased computer without accidents. After experiencing Windows 98, 2000 and getting familiar with Windows XP, Vista, 7, I am so exciting to embrace the huge change on my daily life.

This interface of Windows is designed to be used with touchscreens as well as with a mouse and keyboard, and requires programs to be written specially for it. Your laptop and PCs can still run programs written for older versions of Windows, but it doesn't work on Windows tablets. And to improve the user experience, it’s better to install Windows 8 compatible software to keep you working smoothly.

And today, I’m glad to know that ArcSoft, the expert in multimedia imaging technologies and applications, has upgraded the latest software to perfectly meet the technical requirement of Windows 8. Aiming at providing the most effective solutions to the users worldwide, ArcSoft will always make progress to meet your demands. This time, some popular software including Totalmedia Theatre 5, Panorama Maker 6 and other 12 products have been upgraded to Windows 8 version. You can download the latest version and activate it with activation purchased previously. If you haven’t purchased any product before, don’t worry. You can share the activity page on Facebook, Twitter, Google+ to get a $10 coupon and purchase any product you like on that page.

Now, what are you waiting for? Click your mouse and make a jump to Windows 8!
Get your $10 coupon in activity page: http://www.arcsoft.com/topics/windows8.html

2012年10月23日星期二

Window 8 Users: Ready to Get a High Visual Experience?


Due to the advancement of Internet, the rise of indoorsmen and indoorswomen is never fresh news. We can handle shopping, studying, even sporting at home without being sunburned or getting wet. For me, I like to watch movies to spend my time. And I believe film is favored by most of you. A good media player with smooth playback and elaborate interface will prevent me keep in queue for one hour and more to get a ticket.

To watch stunning 3D movie at home is quite leisure, both time and money are saved. And you can choose any movie you like. Whether watch love story or horrible movies, you can take full control and cut it off at your will. For TotalMedia Theatre, it is a piece of cake. Any DVDs or low-resolution videos, even YouTube videos will be brought up to near high-resolution quality. Never get upset by file formats, TMT plays multimedia files smoothly including Blu-ray, DVD, HD video, SD video, audio and photos and comprehensive video formats like MKV, WMV, MPEG, AVI and more.

Isn't it a quite powerful media player? And today, I’m glad to inform you that TotalMedia Theatre has upgraded to 5.3 version, which can be totally qualified with the technical requirement of Windows 8. Meanwhile, some bugs have been fixed to ensure your cinema-like experience. ArcSoft guarantees that TMT 5.3 defiantly supports Windows 8. If you are interested, please visit: http://www.arcsoft.com/totalmedia-theatre/

2012年10月22日星期一

Creative Ideas for Photograph in Night


Low light levels make night photography a challenging yet rewarding subject. The best results require specialized equipment, like SLR cameras, tripods, cable releases and flashguns. After sunset, the everyday world is magically transformed, and city buildings, fireworks, thunderstorms and the northern lights all become popular subjects.


But you may try many different ways to photograph the gorgeous night. Don’t be upset, below are some creative ideas courtesy from DigicamGuides. Stop hesitating, pick up your camera and freeze the beautiful night.

John Mueller

Light Streaks

Find a moving source of light. Cars are good for this — as they move past the camera, their head and tail lights create streaks of light. This is fun if you can find a lot of moving cars all in the same spot.
Troy Paiva
You can also create artificial streaks of light by using your zoom lens with a slow shutter speed. Set the zoom to a wide angle view, depress the shutter and zoom to telephoto. Any light in the photo will streak toward the camera, which creates a sense of speed and motion.

Painting with Light

Add artificial light to your photograph. You can use flashlights and other light sources to create unique lighting on your primary subject or use colored lights to make things look interesting. You can either use the light source off-camera to illuminate the subject, or include the light source in the photo itself to create additional patterns, or even write your name in lights.

Terri Beitzel

Apparitions

Get a human subject to stand in front of the camera for roughly half the time the shutter is open. For example, if you have a shutter speed of 10 seconds, have your friend stand in front of the camera for 5 seconds, and move out of the way for the other 5. This results in an optical illusion: your friend will appear transparent. 


2012年10月19日星期五

Mirror Shots:Perfect vs. Worst Ever

Mirror is easy to be found everywhere. But the ‘mirror shot’ is a much-debated but evident part of participating in fashion communities. It involves taking a self-portrait with only a camera and a mirror, which might be heard quite easy. Of course, hold the camera and take a shot before a mirror is simple to be done by anyone while it’s hard to spur your creativity. Below photos are courtesy from digital photography school and Smosh. Through comparison, you may find some inspiration from it.


2012年10月16日星期二

Miami Is Calling You, Photographers


I used to sign up in some photographic website and they always send the latest photographic competitions to me. It helps a lot to keep me in line with the newest information. And today, I receive an email informing me to participate in the premier showcase for international emerging contemporary art – SCOPE art sales.


Renowned for presenting the most innovative galleries, artists and curators, SCOPE Art Shows in Miami, Basel, New York, London and the Hamptons have garnered extensive critical acclaim, with sales of over $200 million and attendance of over 425,000 visitors. Art Takes Miami is open to all creative talents (over the age of 18) from anywhere in the world! Professional, amateur and casual artists, photographers and creatives are welcome to apply. The entry will be closed at and the price is quite rich. 

If you’re interested, search the competition on the Internet and submit your work. This is your chance to have a piece of it.

Good Way to Understand Aperture

Aperture is one of the three pillars of photography, the other two being ISO and Shutter Speed. Without a doubt, it is the most talked about subject, because aperture either adds a dimension to a photograph by blurring the background, or magically brings everything in focus.

1) What is Aperture?
Aperture is a hole within a lens, through which light travels into the camera body. Take our eyes as example. The cornea in our eyes is like the front element of a lens – it gathers all external light, then bends it and passes it to the iris. Depending on the amount of light, the iris can either expand or shrink, controlling the size of the pupil, which is a hole that lets the light pass further into the eye. The pupil is essentially what we refer to as aperture in photography. The amount of light that enters the retina (which works just like the camera sensor), is limited to the size of the pupil – the larger the pupil, the more light enters the retina.

2) Size of Aperture – Large vs Small Aperture
In photography, aperture is expressed in f-numbers (for example f/5.6). These f-numbers that are known as “f-stops” are a way of describing the size of the aperture, or how open or closed the aperture is. A smaller f-stop means a larger aperture, while a larger f-stop means a smaller aperture. Most people find this awkward, since we are used to having larger numbers represent larger values, but not in this case. For example, f/1.4 is larger than f/2.0.
Take a look at this chart: The larger the f-number, the smaller the aperture.

3) What is Depth of Field?
The size of the aperture has a direct impact on the depth of field, which is the area of the image that appears sharp. A large f-number such as f/32, (which means a smaller aperture) will bring all foreground and background objects in focus, while a small f-number such as f/1.4 will isolate the foreground from the background by making the foreground objects sharp and the background blurry.


2012年10月14日星期日

How to Take Photos with the Zoom Blur Effect


The first time I saw this photo, I was shocked. I used to think only masters and professional image-processing software can achieve this. However, photography, like many things in life, is easy once you know how. Tips from digital camera school will help you create impressive blur effect photos. It is easy to fail, but with a little practice, you will soon get the hang of things.

1. Control the Zoom
Once you have set your camera to a slow shutter speed, you press the shutter release button whilst simultaneously zooming either in or out and this will automatically distort your pictures.
One of the best things to do is to play around with different zoom techniques as you will discover the best ways to dramatically change the effect of your photographs.

2. Watch out for the Light
When the sun is out, you might well find creating these types of photographs with a slow shutter speed is impossible to achieve due to over exposure. To an extent, it can be solved by increasing the aperture value to as high as it will go.

3. Keep the Camera Still
 This is easier said than done. Try twisting the zoom smoothly and not snatch at the controls. This might take a bit of practice but it will definitely pay off. Get in a comfy position and try to support yourself and your camera using whatever is available. This will enable you to get the best possible results.

4. Shutter Priority Mode
Putting your camera in shutter priority is a good place to start with your ISO set to a low value, just turn the dial down to increase the shutter time until you get the results you are looking for. If the light is changing because of the clouds then you will have to tweak shutter speed for the current light levels.

5. Let’s go Full Manual
If you are shooting on an overcast day you might have a very small aperture, which is a similar set-up to the shutter priority mode. Set your shutter speed to 1 second and then you can tweak the shutter speed setting to get the results by increasing or decreasing the shutter speed time.


2012年10月11日星期四

Why Not Use a White Wall as Background


Identification photos are largely needed in our daily life. When I was in university, I often take photos by myself and develop them at print shop. It is simple to realize; just stand before a white wall and ask your friend to press the shutter. Both time and money are saved. And for product shots for a catalog, it looks better that way.

It seems extremely easy in theory while it takes a lot of experience or a lot of slow and tedious work. First, you need to understand what doesn’t work and why. You can’t put something in front of a white wall, take the shot, and expect the background to be white. It won’t be. Instead it will be some shade of gray. But it is possible to make this work with just two lights – one for the subject and one for the background. If the subject is very large, you will need at least two lights on the background. The main thing is you have to pour a lot more light on the background than you do on the subject.

Next, turn on your background light or lights. You want it to fill the visible area of the background that will show in the image. Take a picture again and look at the image in your LCD panel. If your camera has something called highlight warnings (commonly “blinkies”), turn that on. If the background is properly exposed, then the entire background will be blinking and the subject will look well exposed. Once you get to that point, you are done and you have a perfectly lit subject on a white background.

Although you may face plenty of light and trial and error before accomplishing the same thing, it is a worthwhile exercise to learn how to do it right before spending more money. Just take a trial!


2012年10月10日星期三

How to Take Creative Couples Portraits


Whatever their skill level, most photographers do everything they can to avoid cheesy, awkward and generic couples portraits. But there are a few creative elements to think about while you’re at the location and also when editing your images that will make them a bit more special. Now let’s learn from Alice Laidlaw, a young award-winning photographer.

LOCATIONS
Locations don’t have to be iconic or super amazing. Integrating texture, form and pattern can lend in telling a story about the couple, and create a narrative in your images.
Trees and Foliage:
Framing couples in the branch formations or space around the tree allows it to be important in the composition without distracting from the couple. This is particularly effective if you stand far back from your subjects. Bushy, full foliage with pattern and texture makes a great background.
Buildings:
Doorways, archways and windows are great to position couple in and give the composition a dynamic aspect. It can often give the image balance, and can be applied to both indoor and outdoor sessions. Carefully positioning yourself and your couple in front of these elements can produce great graphic compositions.

EDITING
If you struggle to think of creative ways to present your images to make them stand out, there are a few things to consider which can make a good image a great image.
Cropping:
If you have a great shot of your couple with the expressions you want, don’t be afraid to crop in really tight. This is also an opportunity to create some alternative formats. Cropping to a square format can also lend to an artistic result.
Combining images:
Pair appropriate images together side by side on the canvas. A good option is placing a close-up portrait orientation next to a wider landscape orientation.
Filters:
A very faint colored filter can change so much in your image and alters the mood dramatically. Warming the tone can instantly romanticize a couple’s portrait. To create an even softer effect, reduce the overall saturation of the original image.
Noise:
Once you’ve done your overall adjustments, applying some noise over the image is a great way to add subtle texture and gives your image an “arty” look.
Add a Border:
Adding a border can make such a different in the overall look of the final image and raises the bar in presentation. It certainly makes your image look more like an art photograph, and also acts as a frame. 


2012年10月8日星期一

How to Photograph the Stars on the Night

national geographic

Yesterday, it was reported that there would be a meteor shooting across the sky on that night. But it’s pity that most of people didn’t catch a glimpse of any trail. Don’t be regretful. There will be two successive meteors tomorrow, which leave opportunities to feast your eyes. Therefore, how about studying some star photographic skills from how-to wiki? It will help to freeze the brightest “diamonds”.   

Pick a spot
The first thing is pick a prime location. City lights, airports and other brightly lit areas on the ground cause light pollution. Pick a spot far away from the city, preferably in the mountains, in the desert or in a rural area.

Mount your camera to a telescope
You don't need to attach your camera to a telescope to take star photos. Wide-field sky images work just fine with your camera's lens. But if you want to photograph the moon or planets, you'll need to mount your camera to a telescope.

Take your best shot
national geographic
Mount your camera, set the aperture to open all the way, set the focus to infinity and hold the shutter open for several minutes. Brighter objects only require 2 to 10 minutes while distant galaxies may require 20-30 minutes. Don't touch your rig while the shutter is open. You can hold a piece of cardboard in front of the lens when you trip the shutter. Then, pull it away when the camera "settles".

How to shoot meteors
Pick your target based on the meteor shower. Make sure the moon isn't in your shot, since it's so bright it will drown out the stars and meteors.
You should set your lens for a wide field of view. Keep the shutter open for 2 to 10 minutes. If you're lucky, one or more meteors will cross the camera's field of view during that time. If not, try again!

More practice
Keep a log of the objects you shoot along with notes on cloud cover, light pollution.
Start with the moon. It's big and it's bright, making it easy to photograph, even in areas with moderate light pollution.


2012年10月7日星期日

New Portrait+ Plug-in for PhotoShop: Speed Up Your Efficiency


For most of PhotoShop users, it’s quite annoyed to airbrush blemished skin with hundreds of clicks, and so do I. It’s Ok to spend some time on some delicate work when I am free. But when I am trapped in busy work, I just want to finish it quickly and spare time on other things.

If you are troubled the same way, you may find some useful information here, that is, we are happy to inform you that ArcSoft has released a new Portrait+ plug-in designed for PhotoShop users. The new plug-in combines PhotoShop and Portrait+ together and will greatly improve your efficiency and productivity.

Portrait+ Plug-in applies facial recognition technology to precisely pinpoint facial features instead of requiring complex manual framing. 20 pre-set stunning styles are available including deepen smile, slim face, brighten eyes and more, you can quickly enhance one portrait photo with amazing results and batch-export multiple styles at once. Last but not least, a user-friendly results comparison feature enables you to compare and select the best photos.

If you’re a fan of PhotoShop, you can’t miss this effective photo retouching plug-in. Get free download and take a trial and I believe you won’t regret for it. More specific details, please visit: http://www.arcsoft.com/portraitplus/plug-in-features.html